How to make a cinemagraph
Create visually engaging still-moving images, and experiment with masking and layering techniques using editing software in this resource.
Cinemagraphs appear at first to be still images, but upon closer inspection viewers will see there are cleverly looped moving elements. Cinemagraphs are therefore a blend of ‘cinema’ and ‘photograph’ - still-moving images if you will.
Year level: Yr 9-10
Subjects: Media, Visual Arts
Equipment and materials: editing software (Final Cut Pro X, Adobe Premiere, Da Vinci Resolve) camera equipment if creating own cinemagraph, otherwise can use footage provided.
The term ‘Cinemagraph’ was coined by two fashion photographers, Kevin Burg and Jamie Beck, in 2011.
Created from a simple moving image clip, using editing software, most of the image is frozen while one part is left to continue its motion.
Check out some Burg and Beck's work on their original Cinemagraph page to get a better idea of what a cinemagraph is.
Cinemagraphs create a seemingly never-ending moment, and are used occasionally in advertising as they can sometimes be more engaging or inviting than a still image or poster, but less in your face as a moving-image advertisement.
They can also just be works of art in their own right, as creators of cinemagraphs often adhere to similar composition principles as photographers and cinematographers.
We will go into composition a little later.
They differ from GIFS that have been taken from TV shows and the like, because these types of GIFS rarely loop seamlessly, nor do they appear to be photographs with subtle, moving elements within.
Masking and layering
For a cinemagraph to work, we need to mask areas of the frame, so we can separate the moving image from the still image.
Masking involves drawing within editing software around objects and areas we want to separate.
Cinemagraphs also involve layering, we generally use the moving part as a base layer, put the still frame on top, then mask out the areas we want the moving aspect to come through.
To get you used to this process, you can download and use the footage below, and follow along with the how-to video. The how-to is for Final Cut Pro X, so if you’re using other software, make sure you know where to find and how to use the masking tool.
Today we are going to show you how we made this cinemagraph.
Before you create your own from scratch, you can use the raw footage we used for the above - download it below so you can go through the process yourself first, and then create your own once you're confident with the steps.
Once downloaded, get your editing software ready, and use the video below to see how it's done.
We are using Final Cut Pro today, but if you’re using Adobe Premiere, Da Vinci Resolve or similar, all good, you’ll just need to familiarise yourself with the ‘mask’ or ‘masking’ tool for the editing software you are using.
- Drop the video into your timeline, and move the playhead to a good point in the video to grab a freeze frame (all the still elements of the cinemagraph will come from this frame)
- Go to EDIT>Add Freeze frame, and delete the left and right hand side clip (the cutoffs of the video). You'll be left with just the freeze frame in your timeline (for now)
- Drag the uncut video back into the timeline, and repeat, dropping the second version right after the first. Then, use the trim tool on the end of clip one. What we're trying to do is match the last frame with the opening frame. And because the first frame of both the clips are the same, if we edit the last frame to match the first, this will result in a seamless loop.
- Play through the cut and trim until it flow, then delete the second clip leaving you with an edited clip that will loop
- Move the edited clip to sit above the freeze frame, then trim (backwards or forwards) the freeze frame to it matches the length of the video above it. Turn snapping on in the right hand corner if it doesn't snap to the length of the video automatically.
- Select the effects browser, and find 'draw mask' under masks. Click, drag, and drop the effect onto the top clip, and make sure the playhead is over the clip before you edit the mask
- Move your mouse icon to the preview window, and your icon will turn into a pen icon - you can now draw (well, click to add 'control points') the mask, around the light. Be careful around the globe part, but you can draw a straight line through the black part of the base. Control points can be drawn outside the frame, you can reduce the % of the view and then draw outside. Zoom in to 100% (or higher) when you want to connect your last control point, with your first. This will close the loop and the mask will take immediate effect.
- Move playhead to the start, and play - voila! You have a cinemagraph. In Final Cut, the loop play won't be seamless unfortunately. You can also click 'invert mask' in the top right hand corner - click the film reel icon in the inspector, and under 'draw mask' click invert mask
- To export as GIF, click share icon (top RHC) and select 'Animated large' option. This will save as GIF. Once exported, open using your local browser.
Planning and filming your own
Cinemagraphs work best when the moving-image part loops, creating that sense of infinite movement.
So when planning the moving element of your own cinemagraph, we think about elements we know will repeat, or, if we’re going to loop an actor’s movements, we make sure that action is done in a way it can loop it easily.
The rotating light example we used had an obvious loop point, but capturing things looping out in the wild isn’t always as straight forward.
When planning on your own, you can probably guess that keeping your camera steady, perhaps even locked off with a tripod, is best. Any movement may well ruin your hard work.
They also work best when the movement you include is contrasted with stillness, especially when what’s still feels like it should be moving.
Think of a crowd of people moving through a public space. In footage, they would be moving. So if there is one single person spinning in circles amidst this throng of people, then that would be really effective. That one person moving is contrasted by a crowd of people that should be moving, but aren’t.
You also need to have some element of control with the above example – for example, if people in the crowd get between the camera and the person spinning before they’ve made at least one successful spin, will ruin your cinemagraph.
A nice simple cinemagraph would be to film someone’s face, have them blink but remain incredibly still. After looping a few times, certainly it would feel strange that this person is unmoving, however, it would be even more impactful if you could somehow include in the composition of this frame, something or someone else that will remain still, but that the viewer would feel should be moving.
Below are some cinemagraphs made by students at ACMI / Federation Square.
Have a look and:
- identify the moving and still parts
- imagine where the looped mask would have been drawn - would it have been a really fine, detailed mask, or rougher or broader?
Have a look at this collection of cinemagraphs. With each, instead of identifying the obvious (what’s still and what’s moving) instead identify what should be moving, but is still.
Masking isn’t always that complex either, we rarely need to draw really difficult or complex masks, as it’s often just about creating a barrier between the moving and the still, through a closed loop.
With the cinemagraphs in the above video, you might like to imagine where the invisible masks are.
Contrast
When you plan or film your cinemagraphs, think about:
-What is standing out in the frame, and how?
-What will stay moving (this answer might be the same as the first one)?
-What will you freeze that the viewer would normally expect to move?
How obvious the movement is in your cinemagraph is up to you. It doesn’t have to be obvious and prominent, as the human eye will tend to find its way to the movement when everything else is still, but on the same note, it shouldn’t be a Where’s Wally type ordeal finding the movement within the frame.
Composition
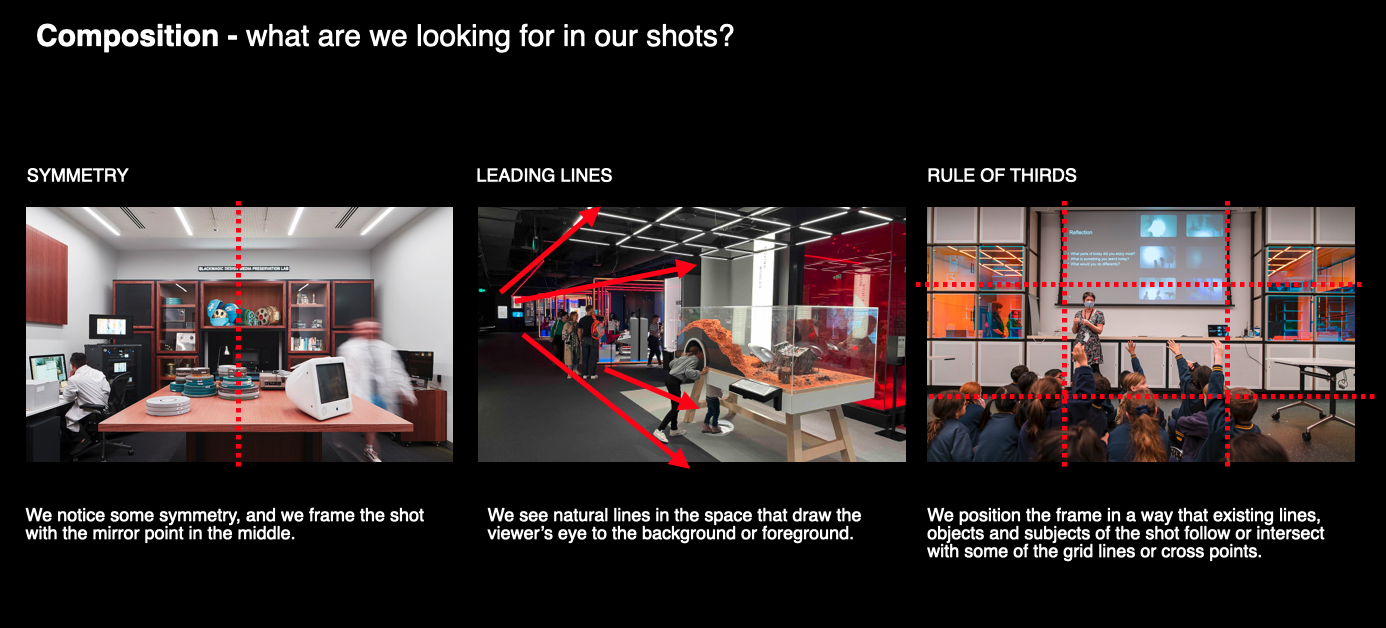
As in photography and cinematography, you can of course use theories of composition in your cinemagraphs, including:
Symmetry - we frame what's in the camera, so the left and right side appear symmetrical, or mirrored. They don't need to be perfectly mirrored! As long as what you're shooting is in the middle of the frame, and is roughly symmetrical, you can't go wrong.
In the example below, the table, walls and cupboards in the background are shot symmetrically, but other elements aren't mirrored.
Rule of thirds - it's not a rule of course. This involves imagining a 9 panel grid over the frame, and aligning elements in the frame along some of these lines. In the example below, the heads of the students and bottom of the cupboard roughly align with the lower horizontal line. The educator is roughly aligned with the left vertical line.
Leading lines - this is where we look for lines in architecture and landscapes, that lead the eye in a certain direction. It could be away from the camera, towards it, left, right, up, down! In the example below, we can see strong leading lines moving left to right, from the distance to the camera (you could also interpret this as leading away from the camera!)